Nowadays, you would hear a lot about automation and how it’s heavily involved in all aspects of software development now. There are so many types of automation, and there are also many fields where automation is involved. In this blog, we will be talking about API automation within the field of testing. Additionally, we will use Postman when we begin working on the demo. If you aren’t familiar with any of the mentioned topics, don’t worry. We will give a quick brief surrounding each topic and provide some resources for your reference.
What is automation, and why do we do it?
As the name itself suggests, automation is the process of transforming something that was previously manually performed, into something that is automatically performed. From that, you can clearly see why we do automation and its benefits. By automating these processes, you are reducing the amount of effort required, compared to when they were manually performed.
The reduction of effort can come in many shapes. Lesser amounts of human interaction required and less time taken to get processes completed are examples of many factors being affected by automation.
What about the cost? Reducing human effort, resources, and time can definitely generate a more favourable return. Although automation itself has a cost, you can calculate your ROI and validate if it’s suitable for your situation or not. Delving into this consideration to automate or not would require multiple factors.
API Automation
The term ‘API Testing’ is often used, but most of the time this kind of testing is done manually. When it comes to automation, it will require a proper setup and some effort to get things ready to go, however, you won’t ever need to run your tests or regression suite manually again. Also, think about how much time this will reduce, plus the higher level of confidence that the process will run successfully every time you run it.
Instead of running your requests manually, then verifying the response, checking data returned, comparing schema and completing the tasks that follow, you will script it once, prepare it, and then it’s just a matter of clicking a button. API automation means moving from manually performing the setup, verification and execution of your APIs, to having all of these automated, and having these actions perform on their own.
Think of the 250+ tests that you would be doing manually, every regression/build time in regards to time, cost, effort, setup, and validation. Besides the effort needed to automate these tests, or any blockers you may face, then all that you need to do on your next run is sit back and watch. Simply run your automated tests and gather the results in a lot less time.
Phase 1: Getting everything ready
In order to start converting your manual tests into automated tests, or if you are starting out with automation in the first place, there are some topics we need to discuss first to confirm how ready you are, what’s missing, or what the next steps will be.
The API Specifications
The first thing you must have are the API specifications, which will let you know how your API behaves in certain scenarios, what to expect/not to expect, the format and shape of requests, and responses.
With that said, based on the level of understanding of the specification, it should be obvious what tests you should begin to create, or what to verify and pay attention to while scripting your tests. You will know when to expect the test to be passed or failed.
Without having API specifications, it will be difficult to get things done quickly. You will have to repeatedly search for answers through developers or by practice, which is a historically inefficient process.
Environments
Environments can vary amongst projects, teams or companies. But a common practice is to have at least one environment per category. So for example, you may have development, QA, and production environments.
For each environment you have, you should gather all the required information, such as environment base url, identity management (authentication & authorization) server info, ports and https certificates if any, and so on.
Targeted environments should be identified in order to get things prepared and also manage your test data.
Backend Readiness
It’s not mandatory that your API is ready for you to start your testing. Sometimes backend services or APIs are yet to be developed or released, so you don’t have to keep waiting until it’s ready.
Scripting your test cases will start regardless of whether APIs are ready or not. You may ask how could I test my scripts if the API is not ready? That’s a simple question, you would have to mock your APIs, either by using Postman mock server, the standalone MockServer, or any other mock service.
Dependencies
Dependencies can come in many different shapes, depending on your business logic or how complex your API is, you might have dependencies on test cases, test data, or it might be an external dependency.
In order to be prepared, dependencies need to be identified so they can be taken into consideration for the execution sequence, for example, test case 2 (TC2) can’t be executed until TCX is passed or executed.
Additionally, you will need to identify any external dependencies. For example, if you use tokens as authentication and you call an external provider/service to get one, you need to make sure that that external service is ready, or else you will need to mock it in order for your tests to work.
Test Data
Test data is a major topic that needs to be prepared and taken care of, especially if we are targeting multiple environments, each environment will have different test data of its own.
Consider each part of your test data. Are you randomly generating it? Is it real data? Does it receive validation? Do you consider endpoints to generate/prepare it, and so on.
Execution
Now after you have everything prepared, it’s time for execution. You should know where your tests are executed, whether it is locally, on a cloud pipeline, or on both for checking and scripting on the CI/CD pipeline for continuous testing.
If your execution is local, it’s not a problem to get your environment set up, get a vpn or proxy connected if needed, and so on. But if you plan to execute on a CI/CD pipeline, make sure your pipeline is already set up and prepared, whether you do it yourself or it’s done by the DevOps team.
Finally, make sure you test your local and cloud environments to confirm their working as expected before your actual testing.
Phase 2: Automated Tests Development
Now, after making sure everything is prepared, it’s time to start scripting and taking care of different parts of the automated test cycle until we get everything finished.
For demo purposes, we will use the api on this website.
Setting up Postman Environments
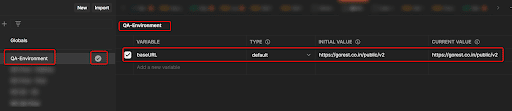
Environments in Postman is a great feature which helps you to store your actual environment’s-related (dev, qa, prod) information or variables as a group to be shared across all your postman requests.
Postman environments will help you quickly switch your testing between different working environments. So, when setting up environments, this is mandatory as we are aiming to have everything working on its own. You should have already identified your environments and prepared their related information during the previous phase.
So, start creating the environments needed and add all the required information across the entire test cycle. For simplicity, we will start by adding the base-URL. Later you can add what’s needed, but make sure you select it as an active one for now:
Creating API Collections
Once you finish creating environments, it’s now time to start creating api collections. Collections is a great feature on postman to group your related tests together and share parameters and variables between each other. It also allows you to be able to run them all together, and perform chain tests if needed.
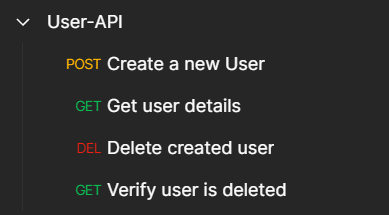
Then, put related tests together in a collection, for example, we will be scripting an end-to-end flow to test users api, where normally you would do the following:
- Generate a token to call your api (in our case, we will get it manually from here).
- Send a POST request to create a user.
- Verify the response from the previous request.
- Send a GET request to get the created user details.
- Verify the data received is as expected.
- Delete the created user.
- Verify user is deleted by making another GET request.
Let’s see how this looks in postman and witness each request:
Create New User Request
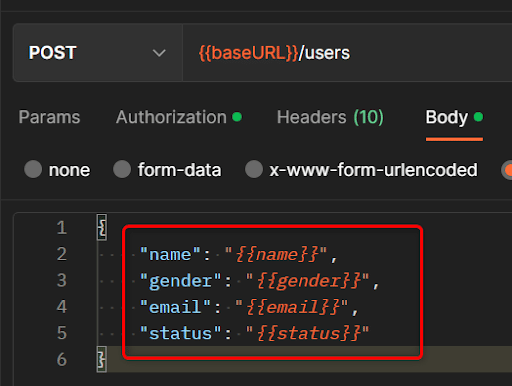
As you can see, we created some requests in order, the end-to-end test the users’ api, which includes a couple of features like create, get, and delete users. Let’s see how the ‘create user’ request looks:
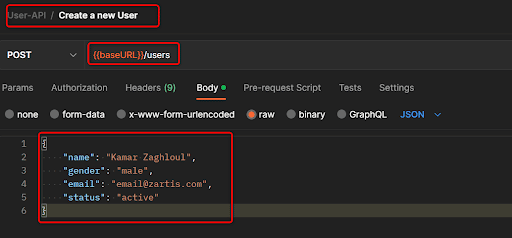
As you can see, we used the environment variable we created earlier ‘baseURL’ in order to make it easy to take care of the target endpoint which is ‘users’, and this is POST request, so we added the required body needed for user creation
Collection Variables
Now, in order to send this request, it will need authorization. But let’s ask ourselves, is this the only request that will require that? Of Course not, the rest of requests will need to have the authorization token also.
Therefore, instead of manually copying the token every time during every request, it’s best to use collection variables to store the token (there are also other types of variables, but this is not the main focus right now).

After we added a collection variable (the scope is for this collection only), now we need to include that in our request, and as this is a bearer token type of authorization, so it looks like this:
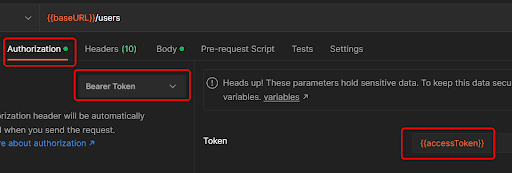
It can now be used on any coming request without the need to manually copy it everytime, just put the variable in each request.
Verifying Response and Writing Tests
If we executed this request, the outcome will be something like this:
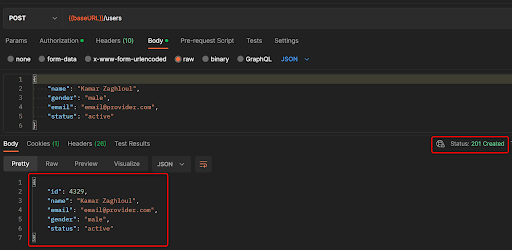
As per the API specification, the response should contain the created user id, and send back the same data used when creating the user, in addition, the status code should be 201.
How can we verify that automatically? This is what Postman provides through the tests.
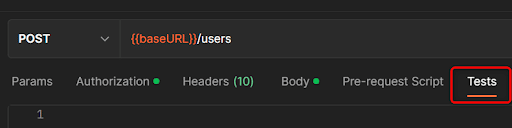
Tests are written in JavaScript code, and Postman custom functions help writing test cases to achieve the required assertions or perform custom implementations. More over, tests run after responses are received.
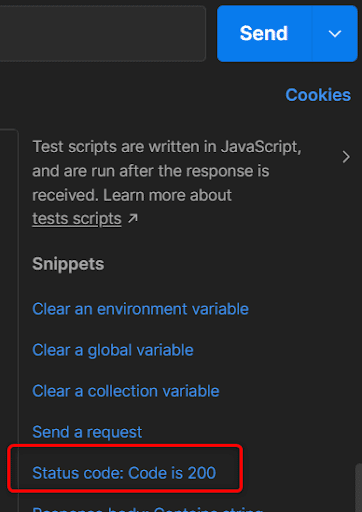
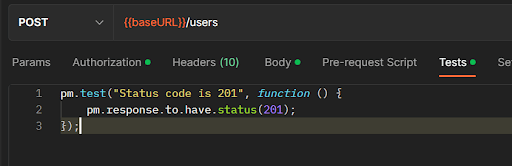
Postman also provides ready-made snippets for the most common tasks that you might use directly, you might notice there’s a snippet for verifying status code as below:
If you used that snippet, you will have the snippet pasted into your tests tab with some modification to match our expectation to have the status code 201, as below:
Using the same concept, you need to add one more case (you can figure it out from snippets or write it on your own by checking and playing with JavaScript), which verifies the response is as expected (data to be the same as sent in create). As a result, you should have two tests like this:
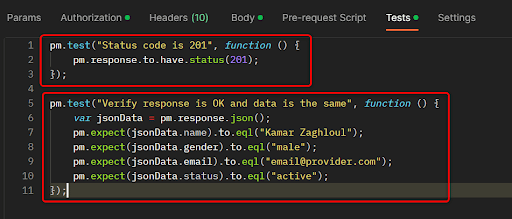
Cool, huh? Let’s run that request now and check the test results tab:
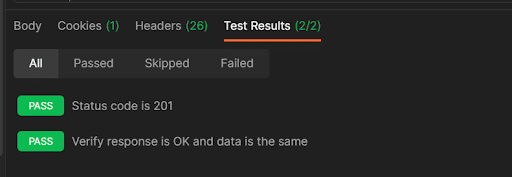
You don’t need to look into the response, it’s automatically verified on behalf of you, as you can see the two test cases you created are passed, rest assured.
Get User Details Request
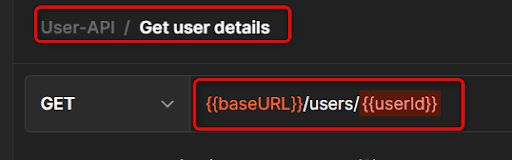
Now you have finished the create user request, we need to verify it actually exists by calling the GET request on users api.
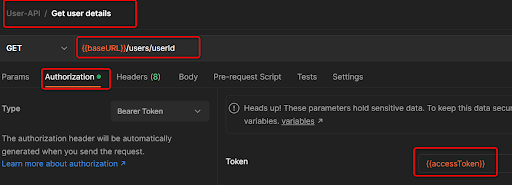
As you can see above, in order to verify the user you just created actually exists, we need to pass the user id to the api as a path parameter. Of course, we won’t get the id from the response by copying it and pasting it in the GET request, this conflicts with what we are doing.
Do you remember we have collection variables? What if we used these to create a new variable automatically when the user is created, then get the id from response and store it in that variable, and finally use that variable in the GET request.
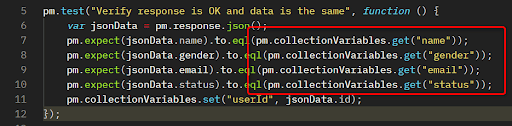
Let’s refactor the create user request Tests and add one more line of code, the end result would be something like this:
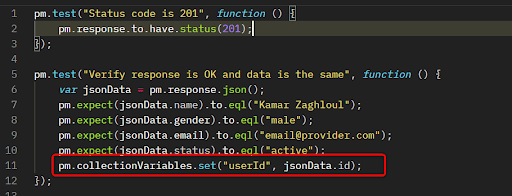
So what we did is, by creating a collection variable by calling pm.collectionVarible.set, it will create the variable if it does not exist and update this variable if it already exists. Variable name is userId, and value is the ID from the response.
If you executed the create user request, you would see a new collection variable created:

Let’s now execute the get user details request, and check the response:
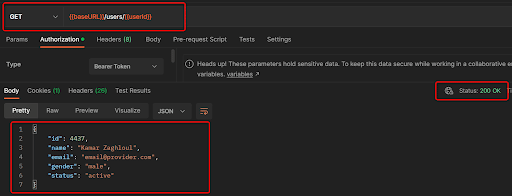
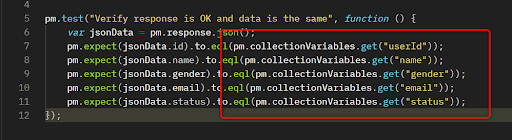
It worked, the same user id in variables are used to get the required user details. So now, how can we verify the response from this request?
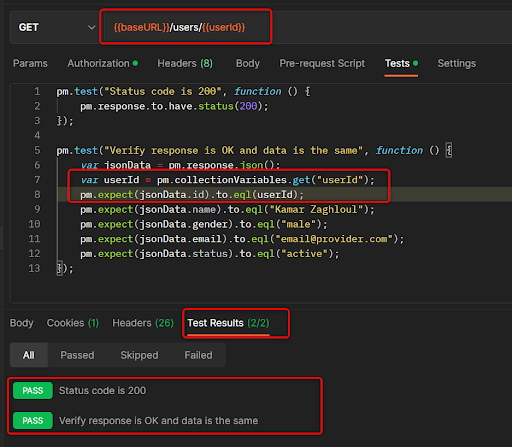
It should be easy now, we do the same as we did with create user request, with a little extra modification:
Duplicate Test Data
Did you notice, the same user details in tests are the same on both create and get requests. What if we needed to change it and we had lots of requests, would we go by each request and update it? This would require a lot of time.
Again, regarding collection variables, let’s put that data as variables, use it in our tests, and do some refactoring.
Collection Variables

Create New User Request – Body
Create New Request Tests
Get user details tests
Delete User Request
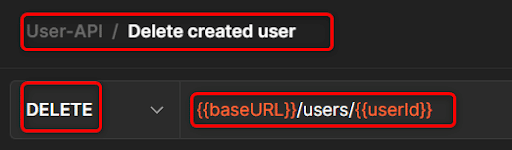
Great, so far so good, we created the user, checked the response, got user details, and checked the response again. Now it’s time to delete that user.
As we have the userId already saved in our collection variables, let’s use it directly in the delete user request:
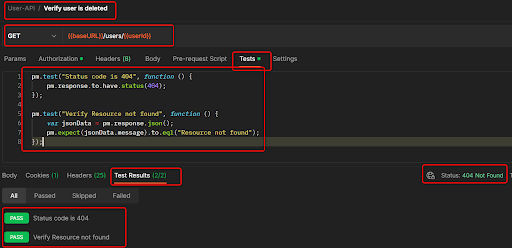
Verify ‘User is Deleted’ Request
In order to verify that the user is deleted, we will use the same GET user details request as below, but on tests we will verify it’s returning a 404 status code as the user already has been deleted and a message appeared saying “Resource not found”.
Phase 3: Automated Tests Execution
Once the scripting phase is done, it’s time to execute test cases, regardless of whether you are going to execute it locally or on any remote cloud pipeline.
Collection Runner
Postman provides a built-in feature called Collection Runner, which provides you with the ability to run a specific collection right away from Postman.
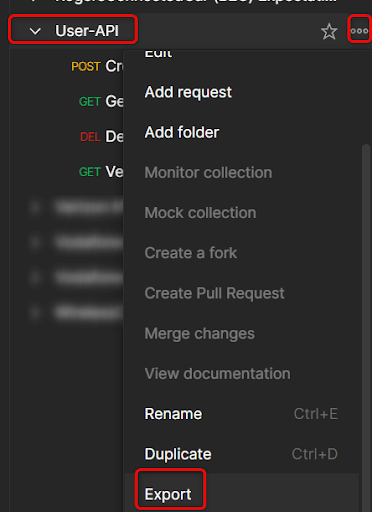
You will only need to click the three dots next to your collection and choose Run Collection as below:

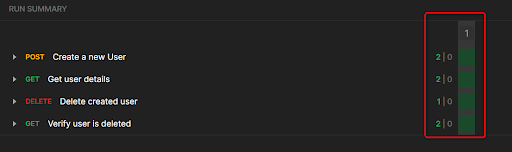
You will see another screen with some inputs, just leave all as it is for now and click Run, once finished, all the requests inside the collection will run along with the Tests included in each request:
In case of errors or failed cases, you will see them highlighted in red.
Newman
There is another option, which is a CLI tool called ‘Newman’ developed by Postman. It provides you with the ability to run your collection from the CLI, whether it’s on a CI/CD pipeline remotely, or locally using your CLI.
It can be downloaded from NPM here. Once you download it through npm, you will need to export both your collection and your environment:
You can then open your CLI, navigate to where the collection is exported, and run the command Newman run full_collection_name -e full_env_name.

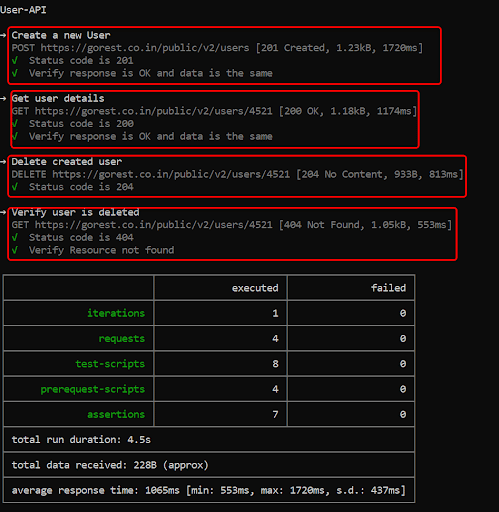
Newman will start reading your collection, execute all the requests, and verify all the test cases inside.
On a CI/CD pipeline, you do the same, install Newman, and run the same command.
Best Practices – API Automation & Testing
Random Data Generation
While testing your api’s, you might need to generate data randomly. Postman can also help in this instance also. Postman has built-in functions to generate different types of random data.
For example, we can generate random emails instead of manually generating them, the syntax of using these random data generators is the following:
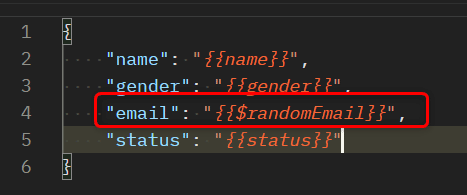
To see the list of all available dynamic and random variables, check it here.
Pre-request Scripts
The pre-request scripts tab is the same as the tests tab. The only difference is that it runs before the request is actually sent. So you might use it in data preparation, call an API endpoint to generate a token, log, set variables before any request runs, and so on.

Mocking APIs
Sometimes your API is not yet ready, but you want to start scripting your test cases. In that scenario, you will have to mock your API’s. There are multiple approaches that can be taken, depending on the scale of your team, workload and so on, you can decide which solution is suitable for you.
Postman MockServer
Postman also provides a mock server, which you can use to predefine requests and responses. You send a request towards your mock server, then it will be matched with a configuration you already set, and you get back the predefined response. Note that you will need to create a postman account and be signed in.
To know more about this, check it out here.
JSON-Server
Another solution is the json-server, an open source simple quick server. You can define your APIs in the form of json files, it then automatically creates CRUD operations for you based on your json files.
You can install this through npm as well, to know more about it, check it out here.
Mockserver
If you want a big scale server with lots of built in features like proxy, assertions, logging, validations and a lot more, then the top choice is the standalone MockServer. This server will be available in your environment, available for all of your teams.
A detailed description of mockserver would require a dedicated post itself, but you can check it out here.
If you have questions regarding the article, or require additional information on the topic, or want to connect with one of our software developers, please reach out!
—
Author: