Bosky Atlani, Principal Engineer at Concert Health, shares her insights on how you can simplify your software development life cycle (SDLC) management using Azure DevOps.
This article was presented as a webinar as part of the ‘Talking .NET’ conference, you can see the full webinar here.
For more general information on DevOps and SRE as well as their benefits, you should read our blog post on why DevOps and SRE are the future of software development.
Before we look into how you can best use Azure DevOps in your SDLC, let’s answer a fundamental question:
What is Azure DevOps?
Azure DevOps is a Software as a service (SaaS) platform from Microsoft that provides an end-to-end DevOps toolchain for developing and deploying software. It also integrates with most leading tools on the market and is a great option for orchestrating a DevOps toolchain. It comprises a range of services covering the full development life-cycle and can also be used to orchestrate third-party tools.
If you don’t want to integrate different sdlc tools, and have one place for source controls, work items, builds, deployments, test cases etc., using Azure DevOps, you can have complete integration and traceability of our entire application lifecycle management.
This article will cover how you can utilize Azure DevOps at scale. So, let’s go through each stage of the SDLC and see how you can utilize Azure DevOps.
How to do work management with Azure DevOps?
Work management is basically your requirements backlog. For the most part, you should be able to use whatever Azure DevOps has provided. Azure DevOps comes with four process templates and depending on the process of your organization, you can choose one that’s closest to you. Here, you can add custom fields, custom states and rules for straight transition that make it appropriate for your team.
Another important thing to remember for work management is the concept of teams. Especially in those early days when there isn’t a lot of documentation, how do you manage teams in Azure DevOps?
In our organization, we had three teams with their own backlog and iterations, so we needed customization. The way to do that in Azure DevOps is with area paths. What are devops area paths in Azure DevOps?
A DevOps area path is simply a field you can assign for every work item in Azure DevOps, and this area path is directly mapped to a team. Each team, because of their area path designation, gets their own backlog, and iterations. This way, they can configure things on their own boards. For example, if one of your teams doesn’t want a particular lane, or a column, they could erase that.
It is worth mentioning here that, you should watch out for efficiency, and you can sustain that with work item templates. Item templates allow you to set smart defaults and create a template out of it. It’s a link that anybody can use to get the same smart defaults such as Bug Templates for Support teams. You can make these items required fields and make them part of a checklist.
Bulk edit is another useful functionality of Azure DevOps when it comes to work management. It’s like Excel where you can go in and select multiple items to edit. You can set changes for whatever you want quickly and easily. For example, when you want to clean up or add a new field somewhere in the middle of the process and you want to default it for the application area. It is also useful when you start a new process in your company; you may not have it all figured out, so you want to be able to iterate. This can help you to not feel frustrated and gives you options on how to go about changes.
How to do source control and code reviews in Azure DevOps?
You can use Azure DevOps Git for source control. It supports GitHub, which is also owned by Microsoft now, and it also supports other version control systems such as subversion and TFS, as well as other source control systems. The nice thing about Azure’s DevOps solution is the unlimited repositories, which is not the case in Bitbucket, for example, where you have to pay extra if you want unlimited repositories.
With Azure DevOps, you can configure your own PR policies or code review policies. To give an example, my team had configured the following code review scenario:
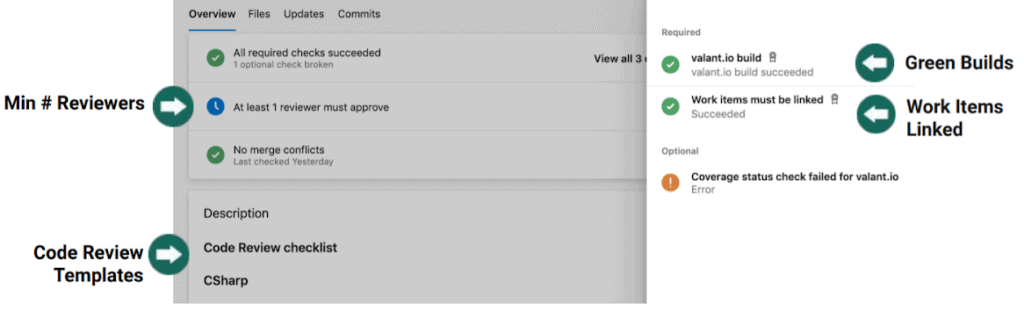
There is a minimum number of reviewers that need to sign off on the code review. You have to have a green Build before you can merge to your integration branch. There are work items, which have to be associated (linked) with something.
According to your templates, you can have custom code review checklists and remind your software developers or testers not to skip certain checks. In BitBucket, you would have to get to their most premium plan to have this functionality.
How to do builds with Azure DevOps?
This is where things get really interesting. This is about the builds and the release pipelines, and Azure DevOps really shines here.
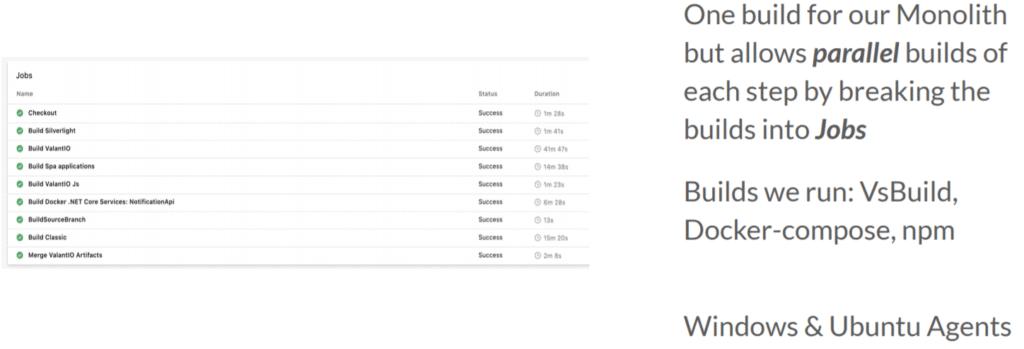
Let’s say you are running a monolith system and you have everything in one repository. Most probably, you will also need a single build. However, if you actually just had one build, it would work ridiculously slow.
Azure DevOps offers the ability to break it down into a build with multiple jobs. Some of the jobs might build parallel to each other and some may have a dependency chain – all depending on your system requirements. It has a very rich plugin architecture and collection for both build and release pipelines.
You can run build applications using any technologies with Windows or Linux agents and you can run all of these builds in parallel without problems.
How to do deployments on Azure DevOps?
In Azure DevOps, when we talk about deployments, we are talking about pipelines. The exact terminology there is release pipelines.
In the example below, we are utilizing continuous integration and partly doing continuous deployment, meaning the deployments don’t go all the way to production. If you haven’t fully adopted continuous deployments, you can set approval gates and make sure everything is fully covered by tests before release.
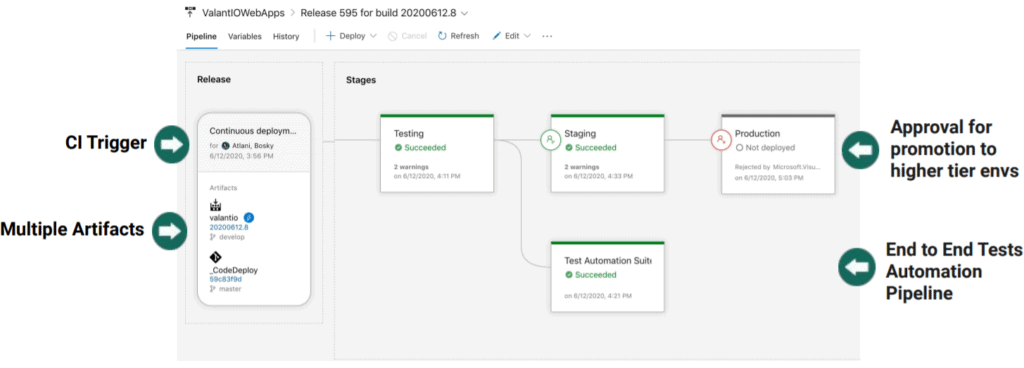
You can see there is a CI trigger. We have our integration branch, which we call develop, and once anybody checks into a merge, it triggers the pipeline above.
It pulls code from multiple sources; the infrastructure code, which is the code to actually deploy things to AWS normally sits in CodeDeploy. So, you can have any number of artifacts coming from different repositories to here.
You can switch to view the ‘Variables’ on the top left corner of the screen. Variables are things you can configure to add a feature flag for an environment, or if you have a configuration setting that’s different for each environment. Azure DevOps will also provide you with system variables. Then there are output variables within testing, staging and production, they are broken down by multiple jobs, just like the build pipeline. So, you can actually pass a particular job or task and that job could generate some output that could be useful to another. Everything is quite configurable.
In Azure DevOps you have an integration environment, you have staging, production and so on, but what we needed was on demand environments – what that means is even before it integrated, we wanted to see if the quality was good enough for a particular area or a particular feature, or we didn’t want to really merge it, very much like a production environment. However, if you create a lot of these, things start to get really expensive – we wanted the ability to spin up an environment on demand and then be able to shut it down for a brief period of time, or stop it and delete it all through the pipeline.
So what we did was, we used the release pipelines but really, as more of a control center for CodeDeploy, so developers and QA and product people don’t need to log into AWS. This means, there’s a step to spin up the environment and then another to do a deployment. But then there are other steps, you know, like how you saw staging and testing, there’s other steps like start environments, stop environment, delete environment, so you can utilize these for different purposes according to your needs.
How to manage releases on Azure DevOps?
If you are not fully automated when it comes to releases, and you need to manage releases on regular intervals, it requires considerable resources. There are many ways to go about this, but in this case, let’s look into how you can lock the branches prior to release. This can help you to deploy from the integration branch versus doing a special hotfix branch and having your developers maintaining multiple branches.
This also brings us to the fundamental release management questions: how do you know what is in production; what has changed and how do you track that?
If you’re not releasing continuously, and you want to track what was released, you either track it during planning, or you track it by looking at what builds made it out to production. You can generate release notes/release scope for purposes of regression planning using Azure API. Once you release, you can use the scope list created to tag/indicate the work items have been released to production.
Let’s say Build #1 is in production environment already and then we look at what build is in our integration environment, let’s call it Build #23. You can use the Azure API to find the differences between 1 and 23, and it lists out all the work items that have been checked in.
Pro Tip:
Define a PR Policy to always link your work items to a PR because once then it will be linked to a commit and then it’s linked basically to the build process, so you can know what’s changed. This is really useful for two things. One is regression testing, because it enables you to do targeted regression. You can test the things that you changed instead of the whole application. Second is, you can use it to do a release scope, and communicate changes to other stakeholders. This can be done through Azure API. It is not available directly within Azure DevOps integrated but they do have an API which you can use for this purpose.
How to do quality assurance on Azure DevOps SDLC (manual)?
A good option for manual testing is Azure Test Plans tool. Test cases are actually available on Azure DevOps by default and you can associate a test case with a user story or a feature, but you can’t organize them. Azure test plans, which is a paid feature of Azure DevOps, allows you to organize test cases into test suites, by feature, or organize test plans such as release test plans or smoke test plans.
The nice thing here is that, not all of your team members need to have the test plans subscription to actually see the plans or execute them – they just can’t define them.
Pro Tip:
Query based suites is a powerful way to create a test suite where you can use custom fields to define a test suite. For example, to create a test suite that touches multiple apps but is in feature area “A”, you can do a query based suite for that. Querying for test cases associated with that feature area will create a test suite for that feature.
How to do analytics with Azure DevOps?
You can use many of the box metrics that Azure DevOps has such as velocity, cumulative flow diagram, cycle time, lead time, bug burndown, code coverage and more. It is all available by default, and you don’t need to do anything except maybe create your own dashboard around it.
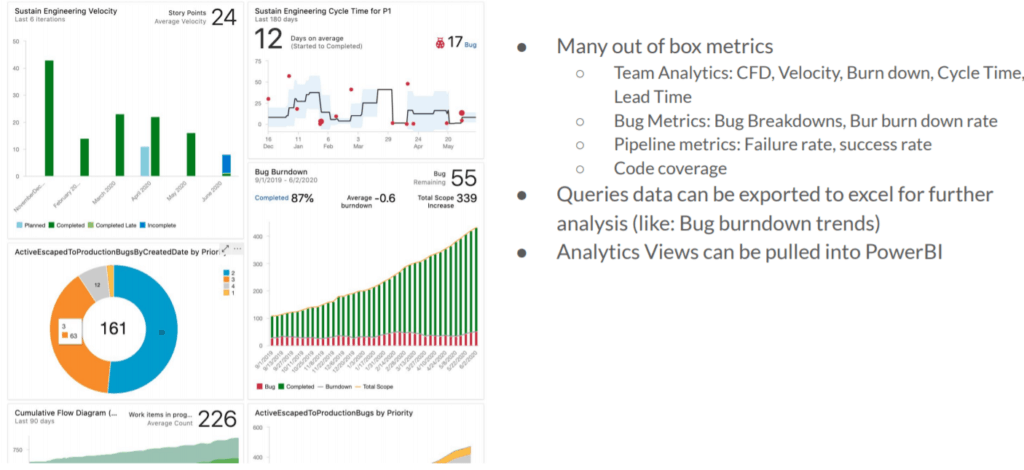
Azure has this feature called Analytic Views. The idea behind analytic views is that it can be pulled into PowerBI and empower you to reach a deeper level of analytics.
When it comes to analytics, it is important to take a note of another useful tool from Azure, which is Azure Application Insights. Once you release your software, you can increase your product confidence and address issues in real-time using Azure Application Insights.
How to tie everything together (Traceability)?
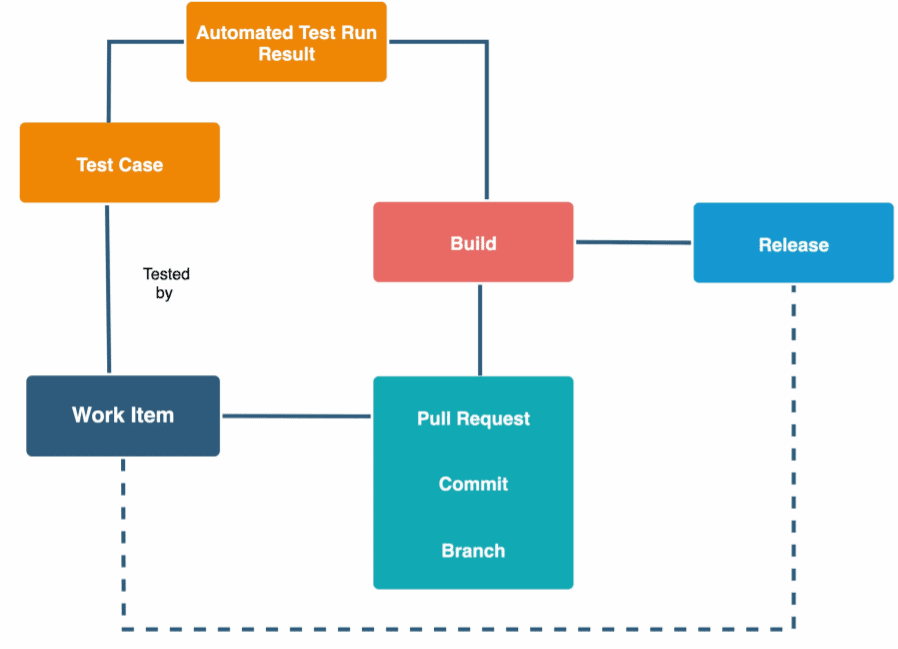
One of the core value-added features that Azure DevOps offers is traceability. Everything is traceable. You start with your work item, which is linked to your branches and your commits and pull requests. The pull requests and builds are related and builds are referenced in releases. So, when you do an automatic unit test, it generates a test run result, which is associated with a build. So when you’re trying to debug an issue and trying to figure out what caused it, you can figure out which build and which commit it was happening in, which work item it was linked to etc. When you run an organization the easy part is writing the code, the hard part is maintaining and debugging and tracking it. Imagine how efficient this makes you.
Summary: Azure DevOps SDLC
